- A. Installing a Text Editor (optional)
- B. Configure Your Computer
- C. Learn to Use the Terminal (Optional)
- D. Test Run for your Setup from Step B
- E. Install IntelliJ
- F. Installing the IntelliJ CS 61B Plugins
- G. Celebrate
We encourage you to complete as much of this setup as you can on your own before coming to lab 1. If you get stuck, come to office hours or lab to get help.
A. Installing a Text Editor (optional)
If you don’t already have a favorite text editor, we recommend installing one.
The three most popular GUI text editors these days seem to be:
- Sublime Text (free but nags you until you pay): https://www.sublimetext.com/
- Atom (free): https://atom.io/
- Visual Studio Code (free): https://code.visualstudio.com/
See this text editor review for a more thorough look at these and other text editors.
The choice isn’t very important, as we will only be using a text editor a few times throughout the course. Most of the time we’ll be using something else called an IDE.
You do not need to pick one of the three options above. You’re welcome to use a different text editor entirely (built-in text editors, vim, emacs, etc).
B. Configure Your Computer
Depending on your operating system, there are a few things we need to do to set your computer up for 61B.
The precise steps to take depend on your operating system.
Move on to the next section only once you’ve completed the instructions above for your operating system. Advanced users on Windows may also use the new Bash for Windows feature, but we will not be providing official directions. Note that if you use Bash for Windows, you’ll need to install Java twice (once inside Bash for Windows, and once inside Windows itself, following the directions above).
C. Learn to Use the Terminal (Optional)
If you already know how to open and use a terminal, skip this section.
The terminal is an application that allows you to run all sorts of programs, as well as manipulate files in your own computer. It is a powerful but also dangerous tool, so please be careful with using some of these commands. On Unix-like operating systems, the Terminal application will provide you with everything that you need. On macOS, for example, you can use Spotlight to search for the Terminal application.
Here are some important ones that you may find useful in this course:
cd: change your working directorycd hwThis command will change your directory to
hw.pwd: present working directorypwdThis command will tell you the full absolute path for the current directory you are in if you are not sure where you are.
.: means your current directorycd .This command will change your directory to the current directory (aka. do nothing).
..: means one parent directory above your current directorycd ..This command will change your directory to its parent. If you are in /workspace/day1/, the command will place you in /workspace/.
ls: list files/folders in directorylsThis command will list all the files and folders in your current directory.
ls -lThis command will list all the files and folders in your current directory with timestamps and file permissions. This can help you double-check if your file updated correctly or change the read-write- execute permissions for your files.
mkdir: make a directorymkdir dirnameThis command will make a directory within the current directory called
dirname.rm: remove a filerm file1This command will remove file1 from the current directory. It will not work if
file1does not exist.rm -r dir1This command will remove the
dir1directory recursively. In other words, it will delete all the files and directories indir1in addition todir1itself. Be careful with this command!cp: copy a filecp lab1/original lab2/duplicateThis command will copy the
originalfile in thelab1directory and and create aduplicatefile in thelab2directory.mv: move or rename a filemv lab1/original lab2/originalThis command moves
originalfromlab1tolab2. Unlikecp, mv does not leave original in thelab1directory.mv lab1/original lab1/newnameThis command does not move the file but rather renames it from
originaltonewname.
There are some other useful tricks when navigating on a command line:
-
Your shell can complete file names and directory names for you with tab completion. When you have an incomplete name (for something that already exists), try pressing the
tabkey for autocomplete or a list of possible names. -
If you want to retype the same instruction used recently, press the
upkey on your keyboard until you see the correct instruction. This saves typing time if you are doing repetitive instructions.
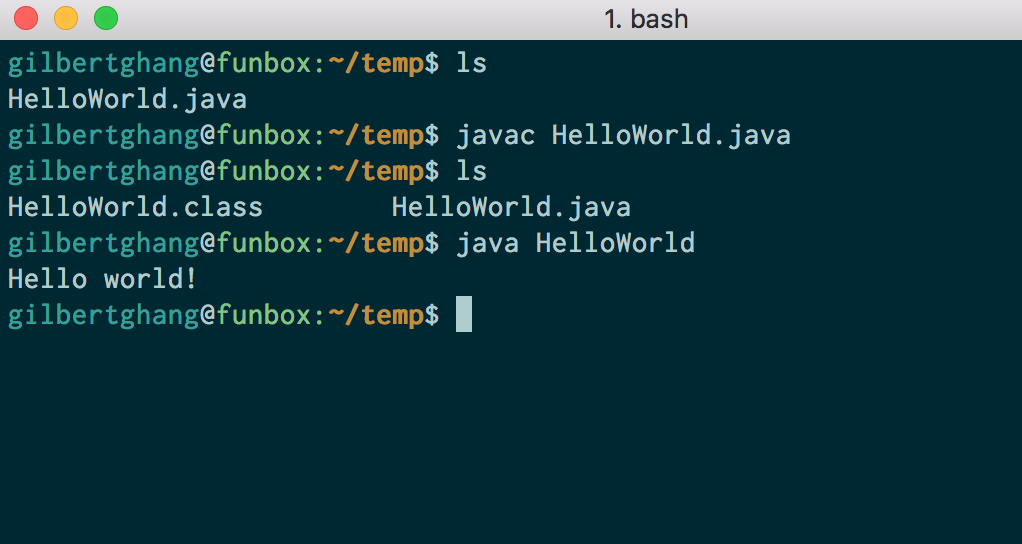
D. Test Run for your Setup from Step B
Let’s ensure that everything is working.
- First open up your terminal. Check that git is a recognized command by typing
the following command:
git --versionThe version number for git should be printed. If you see “git: command not found”, or similar, try opening a new terminal window, restarting your computer, or installing Git again.
-
Second, let’s check that
javacandjavaare working.javacandjavaallow Command Line Compilation, or in other words, the ability to run Java programs directly from the command line. In practice, most developers run Java programs through an IDE like IntelliJ, so we won’t be using command line compilation for much this semester other than testing your setup. Start by running the following commands at your terminal.mkdir ~/temp cd ~/temp-
Then, open your operating system’s file explorer in this directory. You can do this from the command line:
- Mac:
open . - Windows:
explorer . - Ubuntu:
gnome-open . - Linux Mint:
xdg-open .ormate .
- Mac:
-
In this newly opened directory, create a file
HelloWorld.javawith these contents:public class HelloWorld { public static void main(String[] args) { System.out.println("Hello world!"); } } -
In your terminal, enter
ls(list the files/folders in this directory). You should seeHelloWorld.javalisted. -
Run
javac HelloWorld.java. If this produces any output, then something may be wrong with your setup. Try opening a new terminal window or restarting your computer. If that still doesn’t work, see the Troubleshooting section under the directions for your operating system. -
Type
ls, you should see bothHelloWorld.javaand a freshly createdHelloWorld.class(thejavaccommand created this file). -
Run
java HelloWorld. It should print out “Hello world!” for you. If it didn’t, something is wrong with your setup! -
You’re done! You can also delete the “temp” folder and its contents as you please.
The screenshot below shows what we’re hoping for when we do steps 4-7. If you see something similar to this, your java setup is complete.
-
E. Install IntelliJ
-
Download the Community Edition of IntelliJ from the JetBrains website.
-
After selecting the appropriate version for your OS, click download and wait a few minutes for the file to finish downloading.
-
Run the installer. If you have an older version of IntelliJ, you should uninstall it at this time and replace it with this newer version. You can use all of the default installation options, with one exception, if you are on Windows, make sure you check the box “Add launchers dir to the PATH”. If you accidentally missed it, the easiest fix is to uninstall intelliJ, and running the installer again, making sure you check that box the second time around. The image below only applies to Windows.

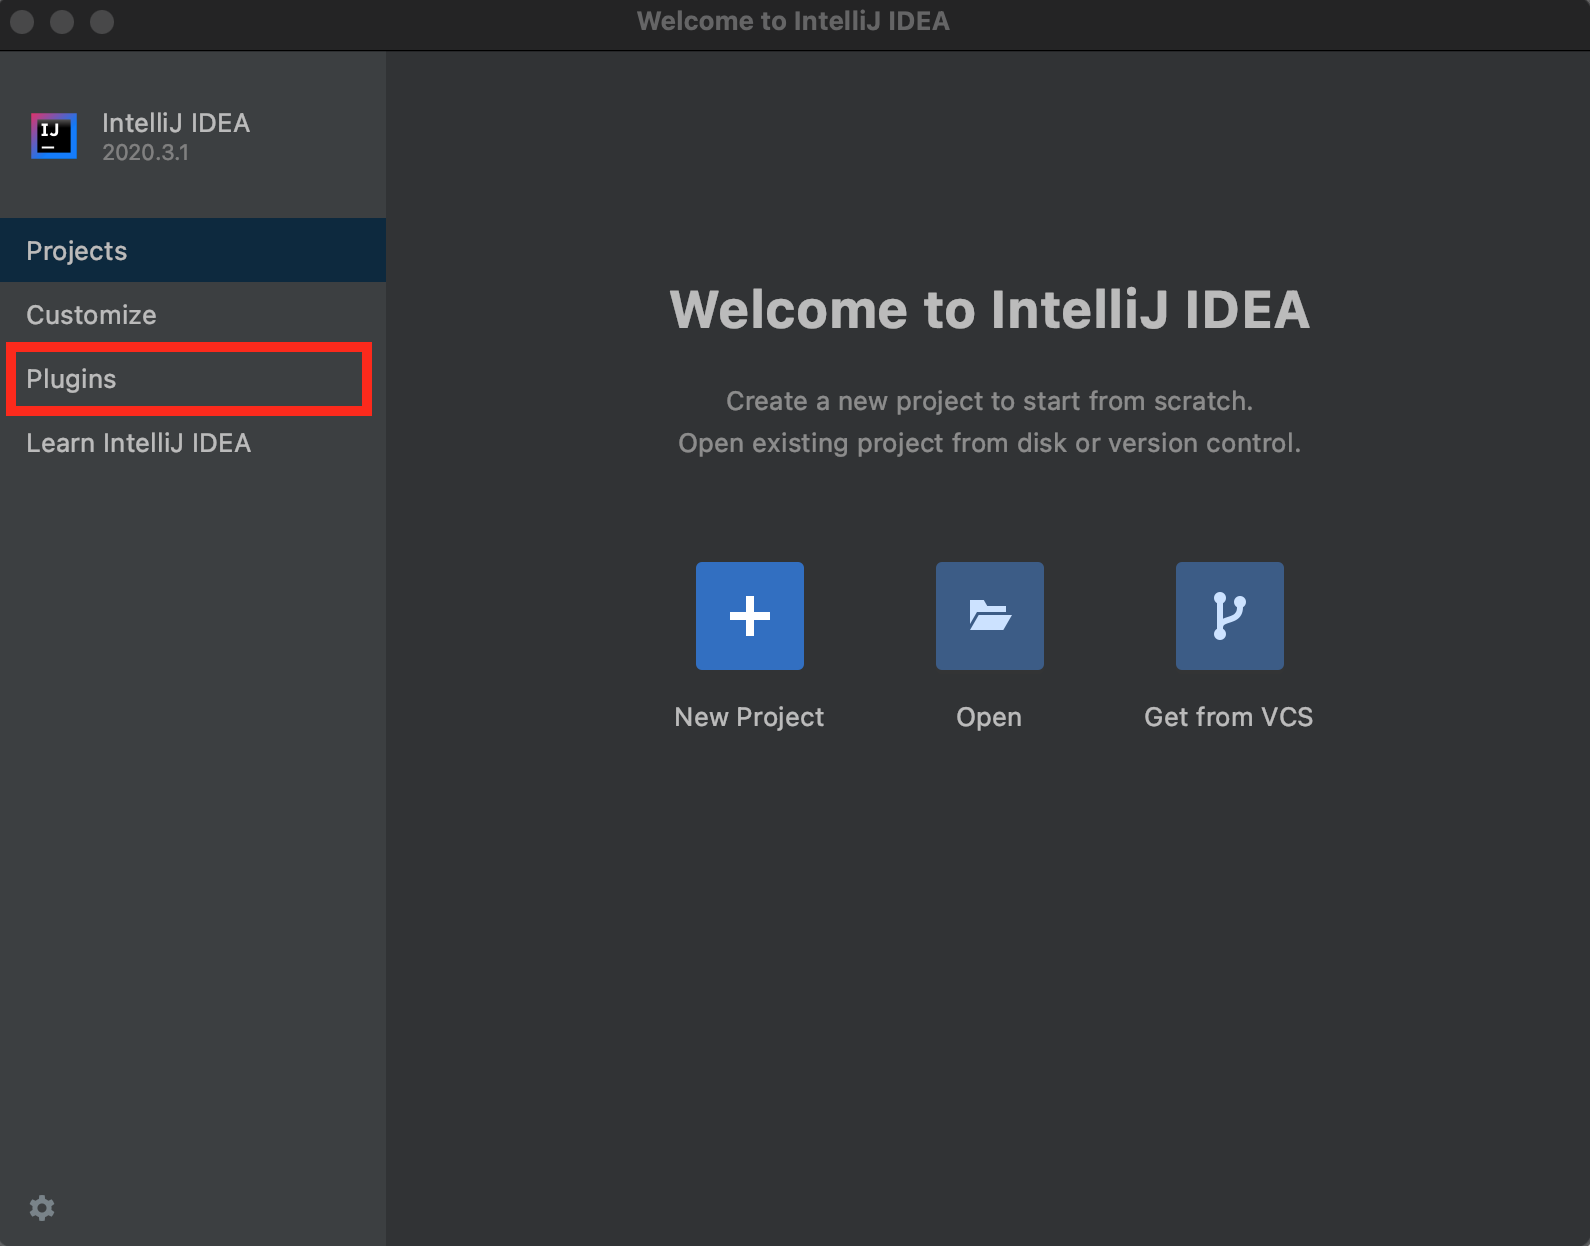
F. Installing the IntelliJ CS 61B Plugins
Begin the setup process by starting up IntelliJ. Then follow the steps below.
Make sure you’re running IntelliJ Version 2020.3.1 or later before continuing. Older versions may also work but we haven’t tried them ourselves.
-
In the Welcome window, click the “Plugins” button in the menu on the left.
-
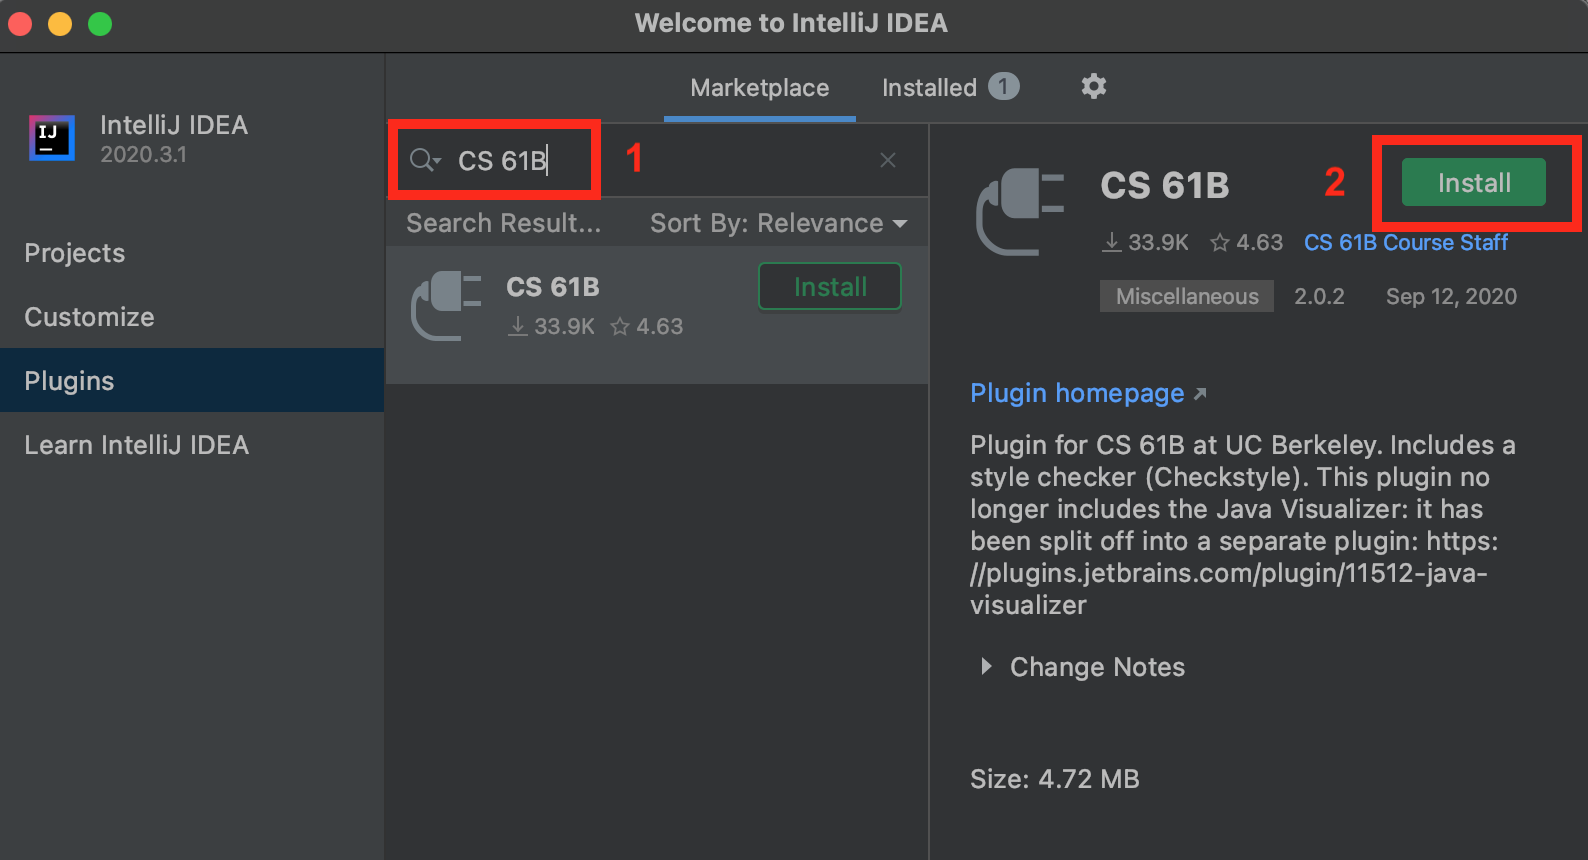
On the window that appears, click “Marketplace” and enter “CS 61B” in the search bar at the top. The CS 61B plugin entry should appear. If you click the autocomplete suggestion, a slightly different window from what is shown below may appear – this is okay.
-
Click the green Install button, and wait for the plugin to download and install.
-
Now, search for “Java Visualizer”, and click the green Install button to install the plugin.
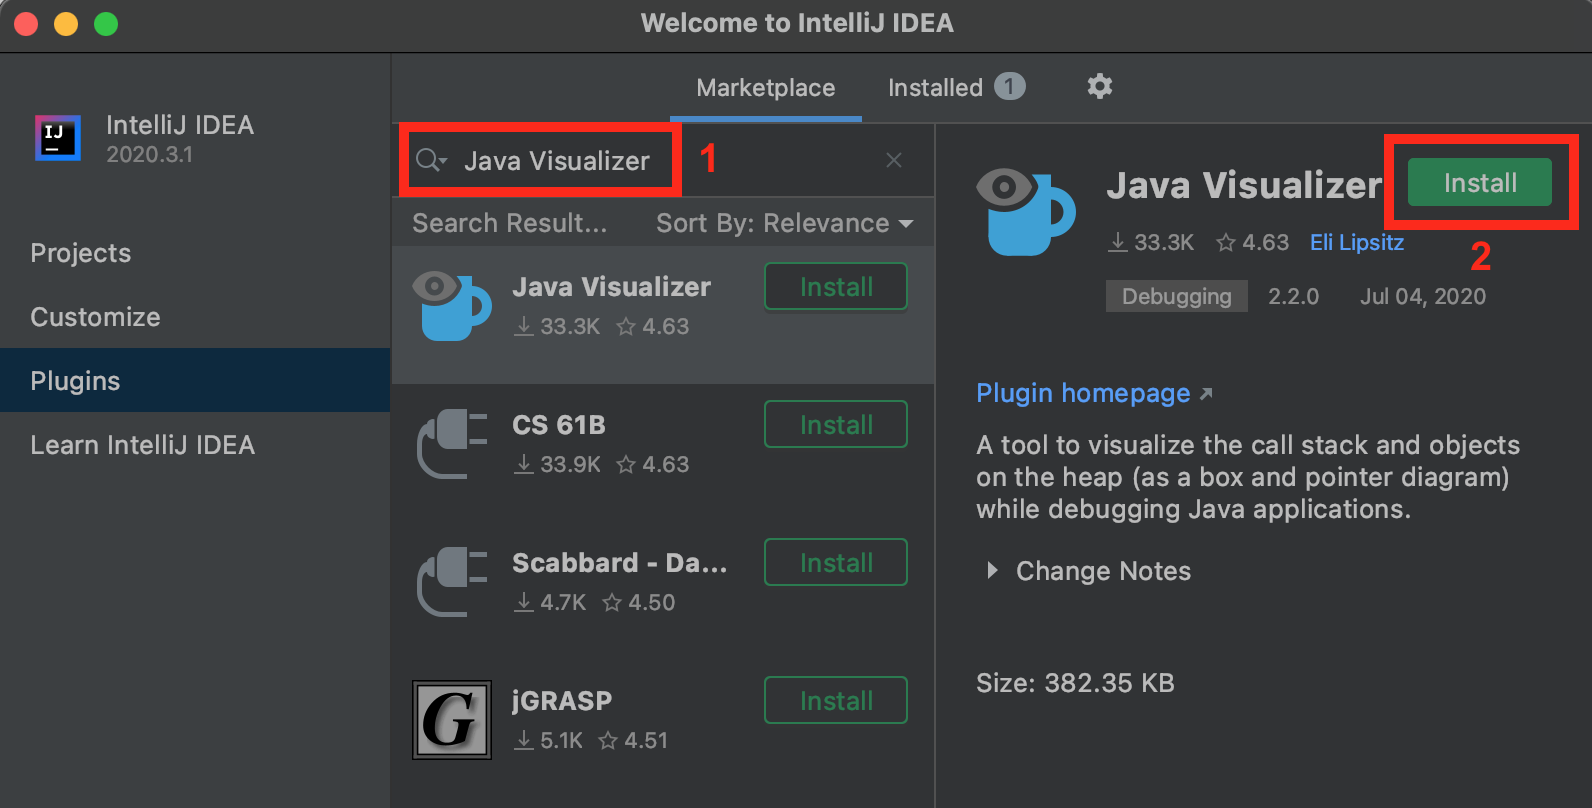
-
If it appears, click the green Restart IDE button to finalize the installation. If you don’t see a Restart IDE button, just continue.
For more information on using the plugins, read the plugin guide. You don’t have to read this right now.
G. Celebrate
Phew! You’re finally done setting everything up. You can now proceed to lab 1.