Author: Boren Tsai
We’ve added a feature to Project 3: BYOW that will allow any pair of students to play each other’s games remotely. Woohoo for Covid safety.
Introduction
We have two 61B students, Alice and Bob. Alice and Bob have really awesome games that they each
want to play but, due to shelter in place laws, they can’t meet. Alice is pretty dejected and goes
to Office Hours to express their disappointment. Luckily, TA Arjun picks up Alice’s ticket and shares
some exciting news: Alice and Bob can still play each other’s games! Arjun first instructs Alice
to pull from skeleton again and then explains that Alice can use the provided BYOWServer to host
a game that Bob can connect to and play using the BYOWClient. Arjun likens this scheme to playing minecraft online.
The client is what the user uses to play the game. The client is in charge of all local calculations, such as graphics,
audio, UI (User Interface), and registering inputs. Meanwhile the remote server (i.e. not your local machine), uses the
internet to listen and execute client inputs. Then, the server sends the client back the information needed to render the
correct game state, to output the correct audio, etc. More information can be found here.
In order to share each other’s games, they will need to implement a new method in the Engine class: interactWithRemoteClient.
Networking
In order to make this possible, we’ve added a layer of networking to proj3. The core functionality
has been given to you in the Networking folder. Here you will find two classes: BYOWClient and
BYOWServer. Important: In order to obtain this folder, you will need to re-pull from skeleton. You will not modify either of these files.
As mentioned above, you will need to implement interactWithRemoteClient in Engine.java. As implied by the method
name, you will be using the BYOWServer in this method to interact with the BYOWClient.
These classes are complete: you will not need to make any adjustments. The parameter for interactWithRemoteClient
is the input string -p [4-digit port number].
Main
The “entry point” for the BYOW server is already there in your code:
else if (args.length == 2 && args[0].equals("-p")) { System.out.println("Coming soon."); }
You’ll be replacing the print statement with the code needed to support the server. In addition, you’ll need to modify the main method
definition to throw an IOException. We’ve included our main method for reference.
+ public static void main(String[] args) throws IOException {
    if (args.length > 2) {
        System.out.println("Can only have two arguments - the flag and input string");
        System.exit(0);
    } else if (args.length == 2 && args[0].equals("-s")) {
        Engine engine = new Engine();
        engine.interactWithInputString(args[1]);
        System.out.println(engine.toString());
    } else if (args.length == 2 && args[0].equals("-p")) {
+       Engine engine = new Engine();
+       engine.interactWithRemoteClient(args[1]);
    } else {
        Engine engine = new Engine();
        engine.interactWithKeyboard();
    }
}
To incorporate remote game sharing, we’ve included documentation and further guidelines below.
BYOWServer
We provide a BYOWServer class that does all of the networking magic for you. You will not need to modify the class, though you’re welcome to if you’d like. The BYOWServer has the following interface:
public class BYOWServer {
    public BYOWServer(int port)

    public void sendCanvasConfig(int width, int height)
    public void sendCanvas()

    public boolean clientHasKeyTyped()
    public char clientNextKeyTyped()

    public void stopConnection()
}
When a BYOWServer is created, you must provide a port number. The port number is an arbitrary integer of your choosing. We recommend choosing a port number that is at least four digits long, e.g. 4005. The number is entirely arbitrary. You’ll learn what ports are if you take a networking course, e.g. CS168. When a BYOWServer is instantiated, the BYOWServer will print the message “Server started. Waiting for client to connect…”, and the constructor will wait until a client connects. Once a client connects, the constructor will print “Client connected!’.
- To communicate with the remote player, we provide four methods. The first method
sendCanvasConfigis used to tell the client what size of StdDraw window it should create. The units are in pixels and should match whatever parameters you provided tosetCanvasSizein theTERendererclass (line 35). You should call this function exactly once whenever your resize the canvas. For your reference, the default StdDraw canvas is 512 by 512 pixels. - The second method
sendCanvas, sends over the contents of the hosting computer’sStdDrawwindow. You should call this every time that you update the screen (i.e. explicitly callingStdDraw.showCanvas()orrenderFrameofTERenderer). - The third method
clientHasKeyTypedis analogous to thehasNextKeyTypedmethod inStdDraw. You should call this in lieu ofStdDraw.hasNextKeyTyped(). - The fourth method
clientNextKeyTypedis analogous to thenextKeyTypedmethod inStdDraw. You should call this in lieu ofStdDraw.nextKeyTyped(). - The fifth method
stopConnectionis used to prompt client to stop displaying the StdDraw canvas and then terminate the connection. We recommend calling this method before the game exits.
We recommend creating a interactWithRemoteClient method that behaves very similarly to interactWithKeyboard method. With the right design, you can avoid code duplication, though you may find that getting your code to call sendCanvas at the right time is a little annoying. For reference, it took Josh Hug about 30 minutes to add server functionality to his existing BYOW client that he hadn’t looked at in a year.
BYOWClient
We also provide a BYOWClient class. It is a complete class and ready to be run. When you run the main method of this
class, you’ll be prompted to provide an IP address and a port.
If you want to test locally, enter “localhost” for the IP address and when prompted for the “port”, give the same number
you used when instantiating your BYOWServer. For example, if you followed our suggestion, that number will be 4005. An example is shown below:
BYOW Client. Please Enter the following information to connect to a server...
IP Address: localhost
Port (this must be a number): 4005
CONFIGURING CANVAS
Testing Your Code
Once you’ve implemented interactWithRemoteClient, first run Main with the command line argument -p 4005 (or whatever port number you picked). Then run BYOWClient and enter localhost and the same port number. You should see two StdDraw windows open, one representing the server, and one representing the client. If properly implemented, the two windows should show the same content.
Supporting Remote Gameplay
Once you’ve managed to get two StdDraw windows that mirror each other, one for the server, and one for the client, it’s time to allow true multiplayer.
If you have not yet implemented interactWithRemoteClient TURN BACK until you have done so.
Once you’ve correctly implemented interactWithRemoteClient, you are now ready to support remote
gameplay.
First, you’ll will also need to download a super cool piece of software called ngrok.
Sign-up for an account and download it here. Add the ngrok executable to your
PATH environment variable; in terminal, use export PATH=$PATH:[path to ngrok executable].
For example, if the executable is located in my Downloads folder, the aforementioned command
would be export PATH=$PATH:~/Downloads/.
Now that you’ve added the ngrok executable to your path and are using the port 4005, open a new terminal and use the command ngrok tcp 4005.
What this does is expose your localhost:4005 that the server is using to the entire internet that people can connect to
using the tcp protocol. Once you run that command, your terminal should look like this picture. 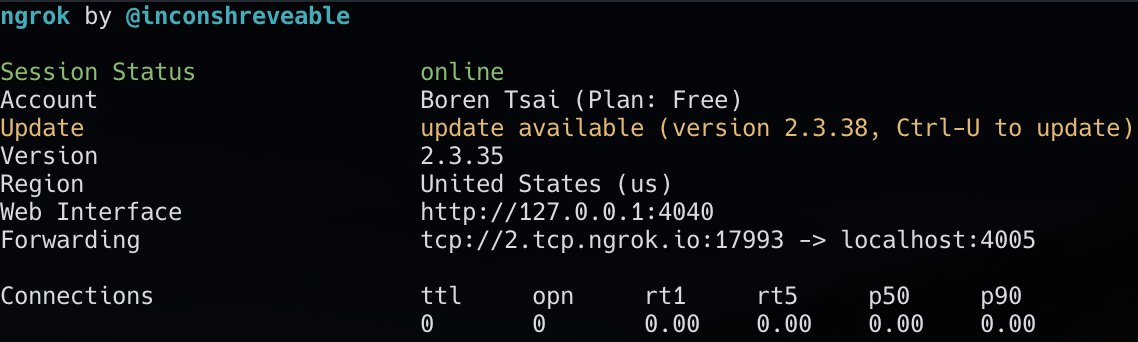
By the line that says forwarding, we see the line tcp://2.tcp.ngrok.io:17993 -> localhost:4005. In effect, this exposes my
localhost:4005 to the internet; as long as my ngrok session is running, all information sent to the address
tcp://2.tcp.ngrok.io:17993 is forwarded to my localhost:4005. In our example, the IP address of the ngrok tunnel is
2.tcp.ngrok.io and the port is 17993. Note: the tcp:// prefix is not needed for the IP address.
Let’s now see how you can use ngrok to allow people on the internet to connect to your BYOW Server. First run the
main method of the Main class with the program arguments -p 4005. After this, enter the command
ngrok tcp 4005 into a new terminal. Send your friend the IP address and port of the tunnel that ngrok opens. Your friend,
after running the BYOWClient, will enter in the information that you sent in the client. After the connection is established,
TADA! your friend should now be able to remotely play your game, while you are able to watch.
Note: This opens up interesting possibilties for allowing the server to modify the world as the player plays. Have fun.
The One Point Bounty
In principle, it is possible to produce a web based client. We have not done so. However, if anyone creates a website which is capable of connecting to a BYOW server, we will award you ONE bonus point, and will likely use this as an official course resource in the future.
Disclaimer
Due to the added overhead of saving the StdDraw canvas and network limitations, you will most likely experience lag in this remote functionality. This is totally fine and expected behavior. We hope you enjoy playing each other’s games.